
You know those moments when you see something so clean, so simple, yet so genius — and you think, “I could totally do that”?
That’s how it was for me with cable railing. Sleek lines. Minimalist vibes. That sense of “I can see everything” instead of chunky wood blocking the view.
But let’s be honest — it’s one thing to admire a finished project and another thing to dive head-first into making your own diy cable railing. There’s a learning curve. There are little things nobody tells you about tension, spacing, and drilling holes straight (oh, the drilling…).
This blog is your shortcut.
No sugarcoating. Just the real steps to go from hmm, interesting idea to wow, I built that.
Step 1: Dream First, Measure Later

Before you touch a single tool, you’ve gotta imagine your space.
What’s the railing for? A deck? A staircase? A balcony?
The beauty of diy cable railing is how it blends in. The cables are barely there visually, yet they’re strong enough to keep people safe.
But each location comes with its own quirks. On a deck, you’re dealing with weather. Inside, it’s about style and how it matches the rest of the room. And here’s the secret — the vibe you’re going for will decide almost every choice later.
I once knew someone who planned their whole railing after they bought the cables. Mistake. Don’t do that. Picture it. Sketch it. Make it feel real in your head before you start measuring.
Step 2: The Holy Trinity — Posts, Cables, and Fittings

Think of a diy cable railing as a triangle of teamwork. You need:
- Strong posts – The backbone. Usually metal or wood.
- Cables – Stainless steel is the way to go for durability and clean looks.
- Fittings/Hardware – The bits that make cables stay tight and not sag like sad spaghetti.
If one of these three is weak, the whole thing is weak.
And yes, stainless steel is non-negotiable for most outdoor situations. It doesn’t rust easily, and it stays looking sharp for years. Indoors? You might get away with other finishes, but… why risk it?
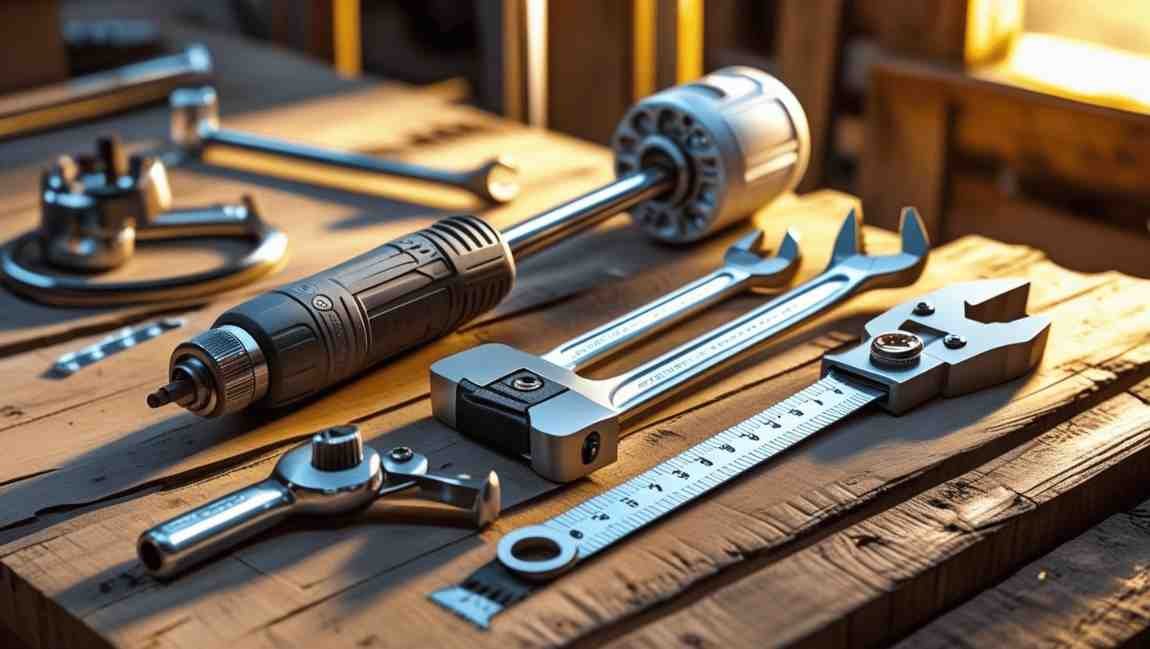
Step 3: Tools — Your Best Friends (or Enemies)
This is where a lot of DIY projects either succeed or crash.
For diy cable railing, you’ll probably need:
- A good drill (and the patience to drill straight)
- Cable cutters (or an angle grinder if you like sparks)
- A level (trust me, eyeballing won’t work here)
- Wrenches for tightening fittings
- A measuring tape you don’t keep losing
- Safety gear — because nothing says “I’m serious” like safety glasses
Small tip: label your tools or keep them in one spot. Cable railing tends to have “why is my wrench missing again” moments.
Step 4: Mark Like a Maniac
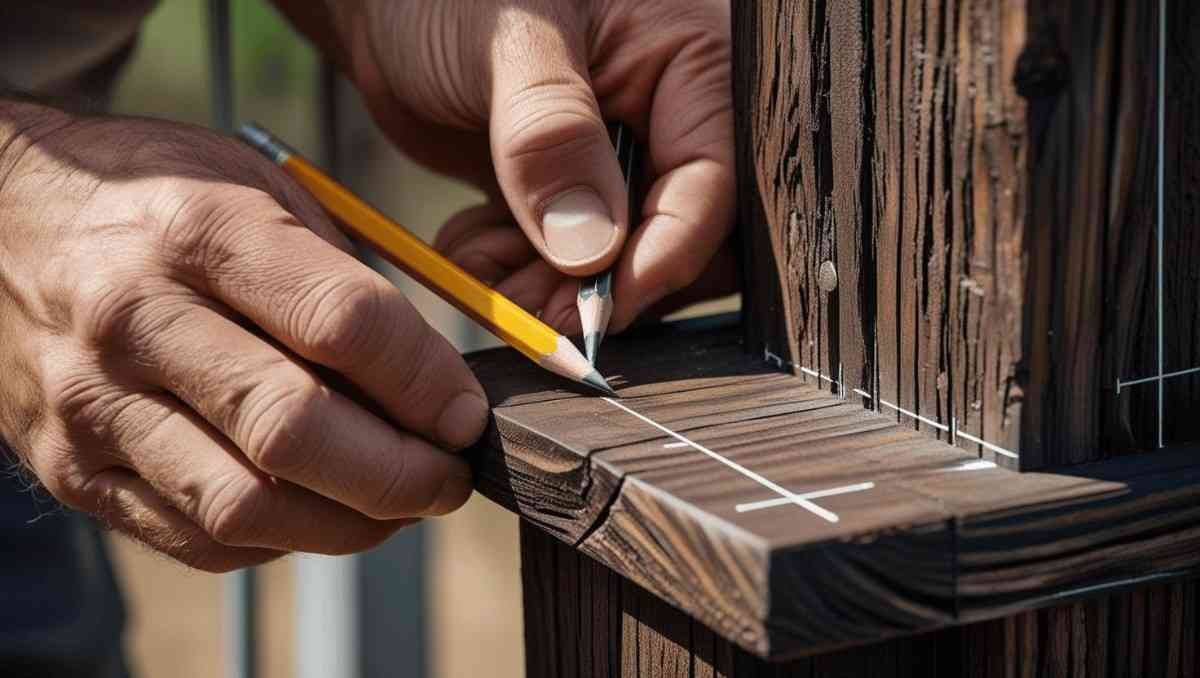
The one thing that separates a neat, pro-looking diy cable railing from a “meh” one is alignment.
Every hole for every cable needs to line up perfectly. We’re talking exact heights from the ground, consistent spacing, and no wandering lines.
Pro tip? Make a drilling template. It’s basically a board with pre-drilled guide holes at your exact spacing. Clamp it to each post, and boom — every hole is in the same place.
And yes, it’s worth spending an hour making the template. You’ll save triple that later.
Step 5: Spacing — The Rule You Can’t Ignore
Cable railing has one big non-negotiable: spacing between cables. Too wide, and it’s unsafe (especially if kids or pets are around). The common sweet spot? Around 3 inches apart from center to center.
That means more cables than you think. If you’ve got a tall railing section, you’ll have more lines than your brain first imagines.
It’s fine. More lines = stronger look and better safety.
Step 6: Installing the Posts — The Drama Begins
Posts are your anchor points. Without them, cables are useless.
Corner posts, especially, need to be rock-solid because they take the most tension. If they wiggle, the cables will loosen faster than you can say “where did I put my wrench?”.
Some folks set wood posts in concrete. Others bolt metal posts to a deck.
The main idea? They need to resist the pull of those cables — which is stronger than it looks.
I remember once helping a neighbor who thought “good enough” was fine for posts. Two weeks later, his corner post leaned like it had a secret. Don’t be that guy. Make them sturdy.
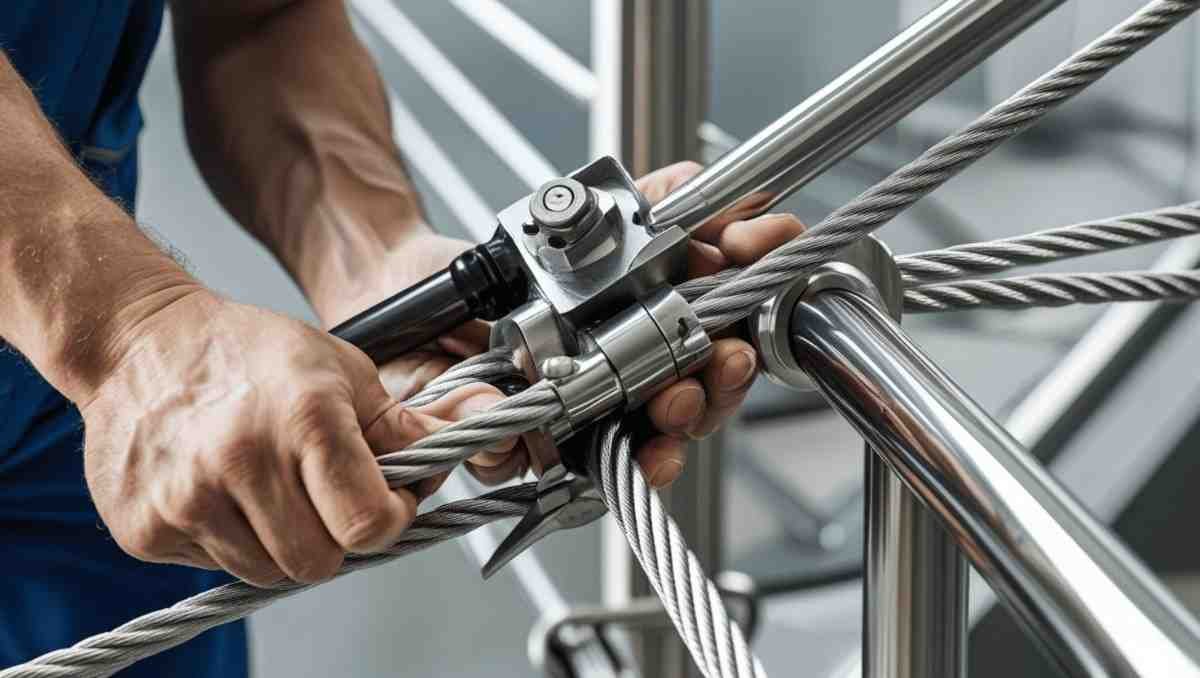
Step 7: Running the Cables — The Zen Part
This is the part that looks satisfying in YouTube videos.
You start feeding the stainless steel cable through the first post, across the span, and out the last post.
You attach the fittings, tighten, and suddenly — a line of perfection appears.
Here’s the thing they don’t show in videos:
- You need to cut each cable to size after threading, not before.
- Tension needs to be even across all lines, or it’ll look sloppy.
- Cables can kink if you force them through at bad angles.
Take your time here. This is the part where your diy cable railing starts looking like… well, a cable railing.
Step 8: Tension — The Secret Sauce
Tight cables = happy railing.
But over-tightening can damage fittings or posts. Under-tightening? Sag city.
The trick is to start tightening from the middle cables and work your way out. This evens the pressure.
Some fittings have built-in tensioners (handy), while others need manual adjustment. Either way — think “snug and strong” rather than “guitar-string tight.”
Also, check them after a week. Cables settle, and you might need a quick re-tighten.
Step 9: Step Back and Admire

This is the moment.
You step back, and instead of bulky wood or wrought iron, you’ve got clean, horizontal lines that practically disappear from view.
Your deck feels bigger. Your stairs feel lighter. The view is uninterrupted.
And you know the best part?
You did it yourself.
No, it wasn’t a “weekend project” unless you’re some kind of time wizard. But now you’ve got something strong, modern, and seriously good-looking.
Extra Tips Nobody Tells You
- Stainless steel cables look even better when you wipe them down after installation. That “factory clean” shine is worth it.
- If your posts are wood, pre-drill slightly larger holes to let the cables move freely without biting into the wood.
- Always install top to bottom or bottom to top — never jump around randomly. It keeps tension even.
Why DIY Cable Railing is Worth It
It’s not just about looks (though, let’s be honest, they look amazing).
diy cable railing brings:
- Better views
- A modern, timeless style
- Low maintenance compared to bulky railings
- A surprising sense of openness in your space
And yeah, it’s one of those projects where you’ll catch yourself saying, “I built that” every time someone visits.
Do you know how DIY Cable Railing helps in to propose? See Here
A Quick Recap
If we strip away all the stories and details, here’s your game plan:
- Imagine the design before you start.
- Get the right posts, cables, and fittings.
- Gather your tools.
- Mark holes with precision.
- Keep cable spacing around 3 inches.
- Make posts rock-solid.
- Run cables carefully.
- Tension evenly.
- Admire your masterpiece.
Closing Thoughts
Cable railing isn’t just another DIY trend. It’s here to stay.
And doing it yourself? That’s the part that makes it personal. Every drill hole, every turn of the wrench — it’s your work.
So if you’re standing on your deck one day, coffee in hand, watching sunlight bounce off those perfect cables… you’ll know.
You didn’t just build a railing.
You built a view.
Want to see more DIY solutions?
Check these: